EC2 = ECC = Elastic Compute Cloud
A web service that provides resize able compute capacity in the Cloud. It reduces time required to obtain and boot a new server instance to minutes, allowing scale capacity up or down based on changing requirements.
>> Pay for capacity you use. Unlike previously where you used to buy server on 5 years term.
EC2 Options
On Demand
Pay fixed rate by hour or second with no commitment
- No upfront payments or long-term contracts
- Applications with short-term, spiky or unpredictable work load
- Applications being developed and tested.
- Easy to provision – Terminate when you are don. Pay for by hour or by second.
Reserved
1 to 3 years contract. Much more discount
- Applications in steady state and predictable usage.
- Reserved capacity
- Users make upfront payment to reduce their total computing costs.
- Get maximum benefit on 3-year contract. (upto 75% off on-demand cost)
- Convertible RIs… Go from CPU intensive to Memory intensive.
- Schedule RIs (Reserved Instances) … predictable reoccurring schedules, weekly or monthly etc.
Spot
Bit a price for instance capacity. price goes up and down like stock market.
- Applications have flexible start and end times.
- only feasible at very low compute prices.
- Users with urgent need for large amounts of additional compute capacity.
- If terminated, you will not be charged for the partial hour. But if you terminate, you will be charged.
Dedicated Hosts
Physical EC2 Servers, dedicated for your use. Can help in reducing the costs by allowing to use existing server-bound software licenses.
- Useful for regulatory requirements that many not support multi-tenant virtualization.
- licensing that does not support multi-tenancy or cloud deployments.
- can be purchased on demand (hourly)
EC2 Instance Types
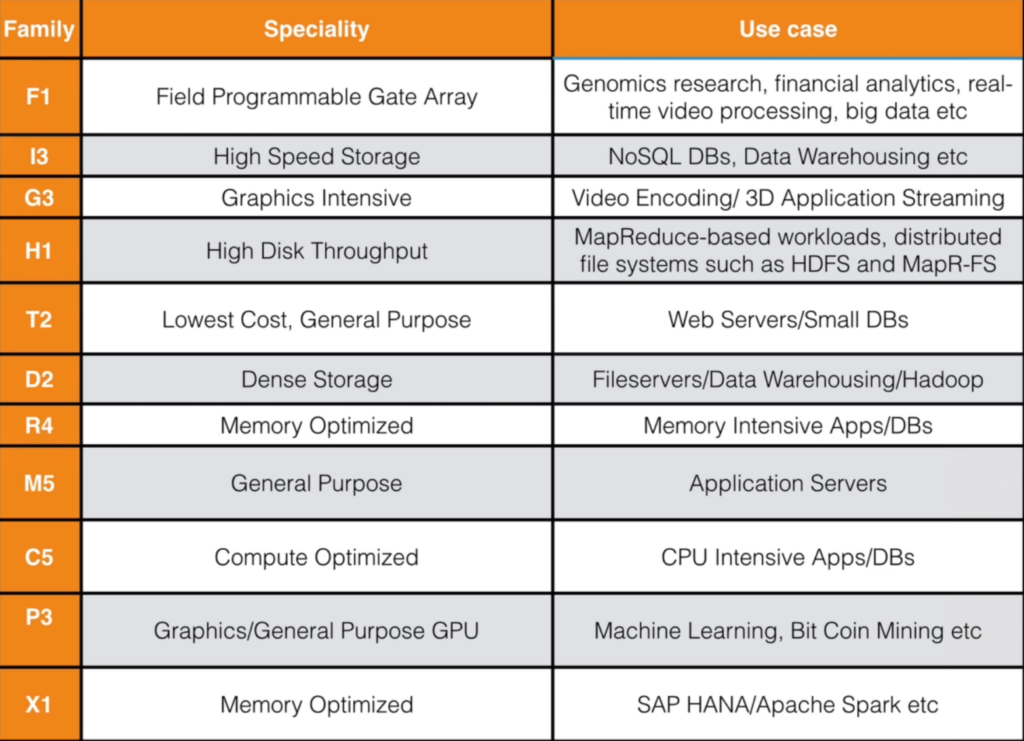


EBS
EBS – Elastic Block Storage – Virtual Disk
- creates storage volumes and attach them to Amazon EC2 instances.
- create file systems on top of these volumes
- automatically replicated in specific Availability Zone. Protects from failure of a single component.
- C drive, D drive etc.
EBS Volume Types
General Purpose SSD (GP2)
- Balances price and performance.
- Ratio 3 IOPS per GB with 10,000 IOPS and ability to burst upto 3000 IOPS for extended period of time for volumes at 3334 GiB and above.
Provisioned IOPS SSD (IO1)
- Designed for I/O intensive applications
- e.g. large relational or NoSQL databases
- Use if need more than 10,000 IOPS
- provision upto 20,000 IOPS per volume
Throughput Optimized HDD (ST1)
- Big Data,
- Data Warehousing
- Log Processing
- Cannot be a boot volume
Cold HDD (SC1)
- Low cost storage for infrequently accessed workloads
- File Server
- Cannot be a boot volume
Magnetic (Standard)
- Lowest cost per GB of all volume types that are bootable.
- Obsolete
- Used when data is accessed in frequently
- lowest storage cost is important.
Hands-On EC2
- Set your Region –
- Login to Amazon Console
- From Service menu, under Compute, select EC2
Launch Instance
- From EC2 dashboard, click on Launch Instance button.
- Choose from Amazon Machine Images
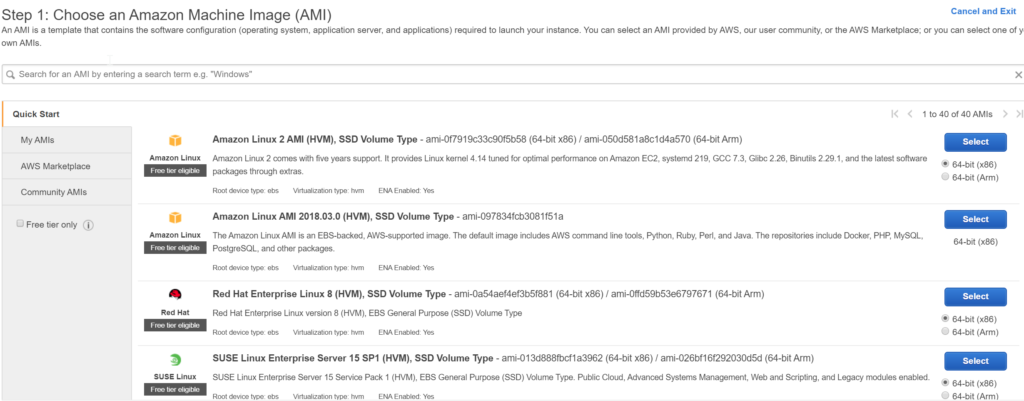
- Select first one (Amazon Linux 2 AMI (HMV), SSD Volume Type)
- Choose the Instance Type
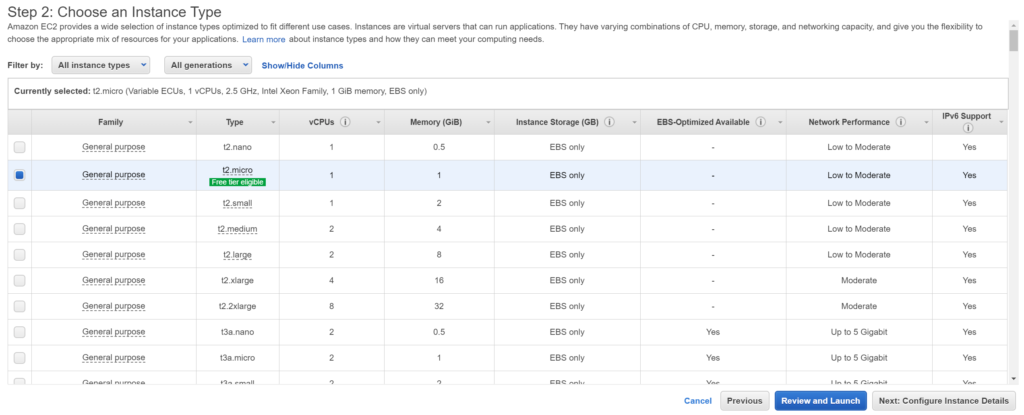
- Configure Instance Details
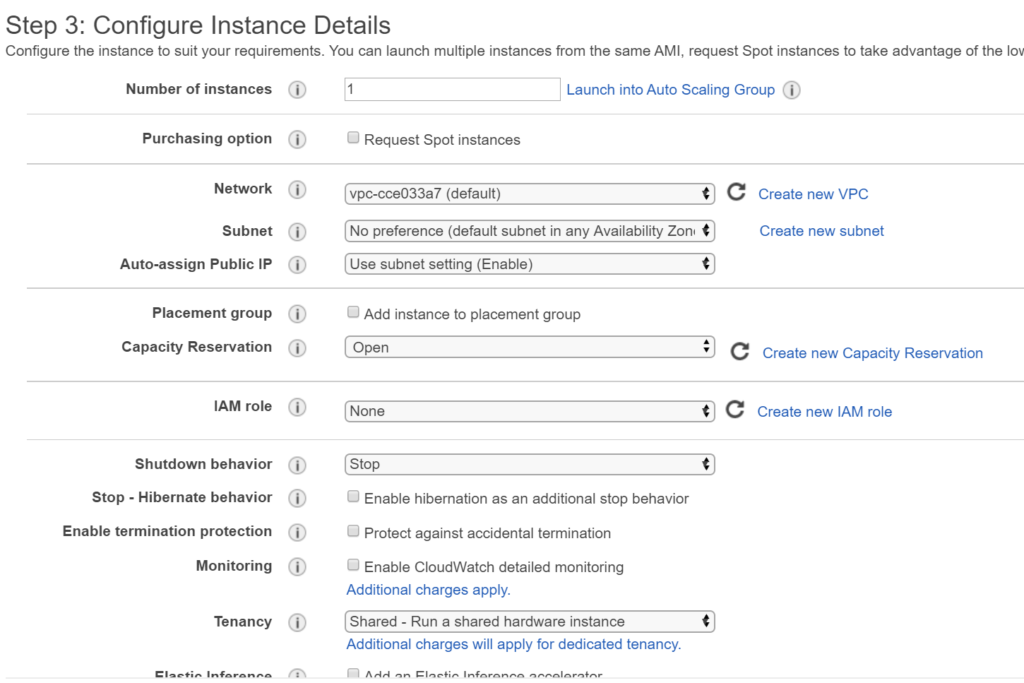
- Add Storage

- Add Tags

- Configure Security Groups
- Rename Security Group’s name
- Source: Anywhere
- Add Rule > Type = HTTP, Source = Anywhere
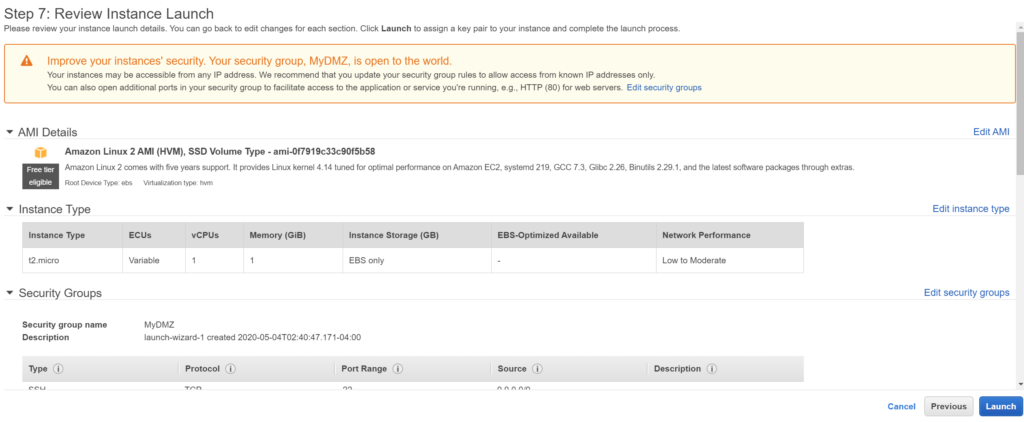
- Hit Review and Launch.

- Ignore warning… security group is open to the world.
- Hit Launch
- Create a new Key Pair. Give it a name. Download CSV and SAVE.
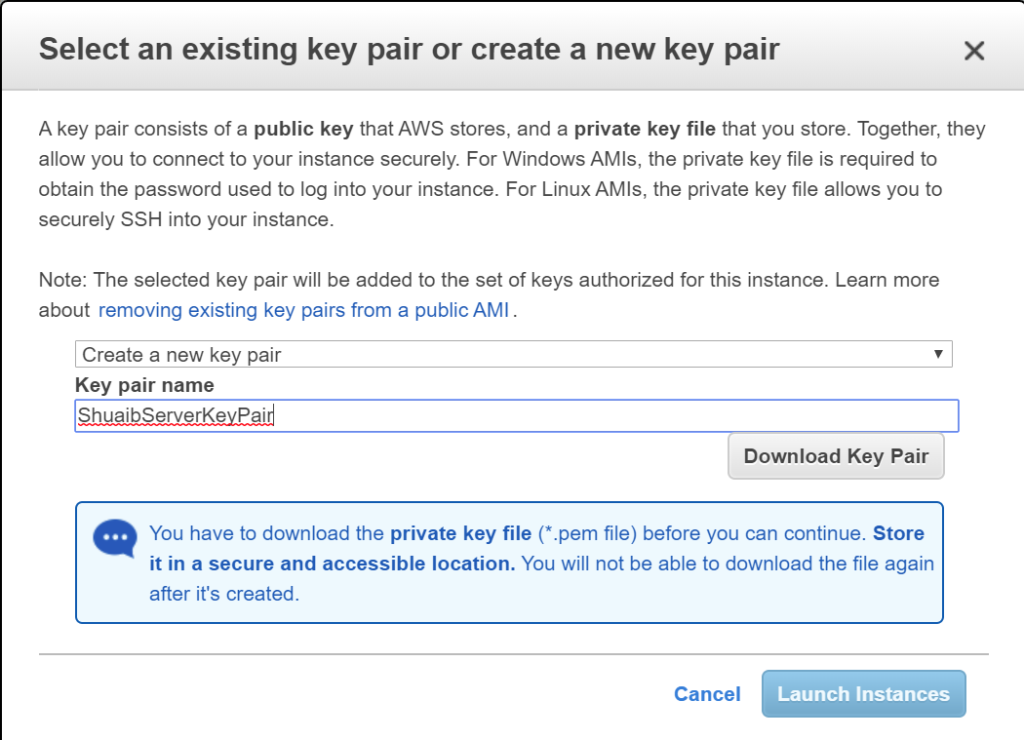
- Hit Launch

- View Instance

- Wait for instance to get running.
Connect to the instance
- Select the running instance and click on Connect button.
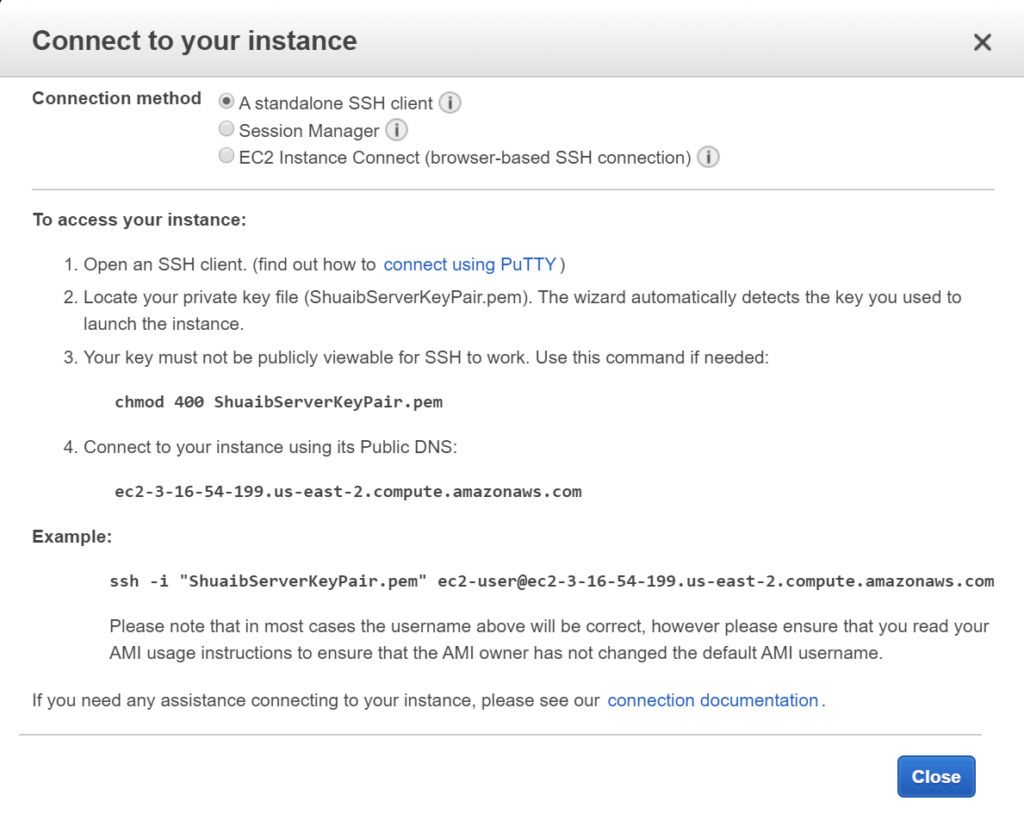
Following steps are for Windows Users
Using PuTTY and PuTTYgen
- Putty does not support .pem files so we need to convert them to .ppk files using PuTTYgen
- Search PuTTY on google or go to https://www.chiark.greenend.org.uk/~sgtatham/putty/latest.html
- Download PuTTY and PuTTYgen
Run PuTTYgen to convert .pem file to .ppk file

- Load Private Key

- Select Save Private Key and save .ppk file locally.
Now Run PuTTY
- From AWS Management Console select the Instance’s IP Address
- In Host Name type ec2-user@[IP Address] where IP Address is Instance’s IP Address.
- Copy it in SAVE text box also

- Click on SSH > Auth and upload the .ppk file created previously.

- Click on OPEN and WUHOOOOO…..

Setting up Apache Web Server
- Elevate privileges to superuser sudo su . This will make you superuser (shows root@ip address).
- To update the linux server OS and packages, type yum update -y
- To install Apache, type yum install httpd -y
- Now to start Apache service, type service httpd start
- To ensure on server reboots, Apache restarts, run command chkconfig httpd on
- To check the status of Apache type service httpd status
- go to directory cd /var/www/html
- check directory contents ls (nothing is there initally)
- create a webpage in text editor nano index.html
- Write little HTML text in the file. <html><body><h1>Hello Shuaib</h1></body></html> . Exit and Save.
- Check ls (new file exists)
- Go to web browser, enter URL, HTML page will load.
Elastic Load Balancer
Balances load between multiple servers. There are three types.
Application Load Balancer
- On Application Layer (Layer 7)
- e.g. sales.mysite.com (sub domain, service type etc.)
- very clever routing decisions
- HTTP and HTTPS traffic.
Network Load Balancer
- Layer 4 – Network Layer
- Most expensive – Production
- TCP traffic – Extreme performance
- millions of requests per second
Classic Load Balancer
- Legacy – Not Recommended any more
- Exam may have questions about this.
- Layer 7 specific features: X-Forwarded or sticky sessions
Load balancer Errors
- if ELB stops responding – 504 Error
- issue either at Server layer or at database layer
- Identify where is application failing – Scale Up or Scale Out
X-Forwarded-For Header
- 123.12.3.213 (Public IP) >> 10.0.0.23 (Load balancer’s Internal IP) (EC2 will only see local address)
- So Public Address is found in X-Forwarded-For Header
Route53
- Amazon’s DNS Service.
- Allow you to map domain names to EC2 instances, Load balancers or S3 buckets.
Hands-on Route 53
- In AWS Console’s Services tab, go to Networking & Content Delivery and select Route 53
- Click on DNS Management
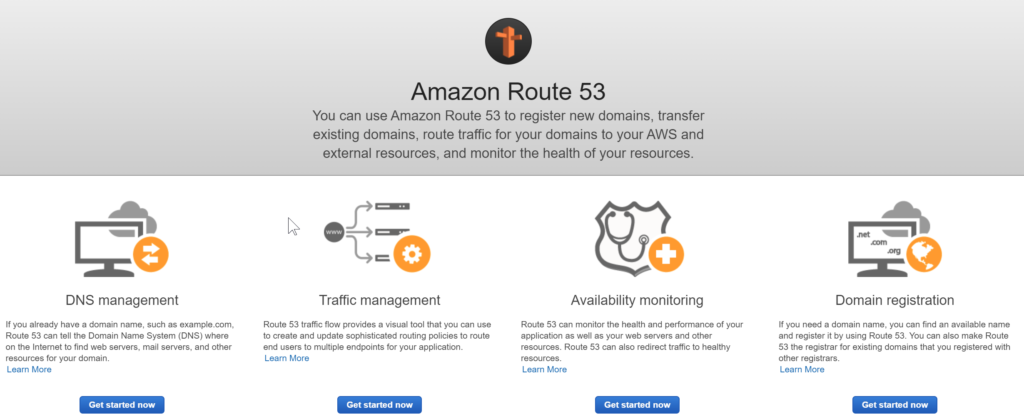
Register a Domain
- Left menu select Domains > Registered Domains
- Register domain and pay.
- Once purchased, domain registration takes upto 3 days.
- In Dashboard, look at Hosted Zones, you can see your registered domain.
- Go to Create Record Set. you can see your recordsets here.

- Create an A Record.
- Use Alias for naked domain name (domain name without www.)
- Alias is available for A and AAAA records
- Later we will create a Load Balancer and will put our EC2 instance behind that load balancer.
- Go to Services >> EC2.
- We already created an instance here,
- In left menu select Load Balancers
- Click on Create a Load Balancer

- Create application load balancer
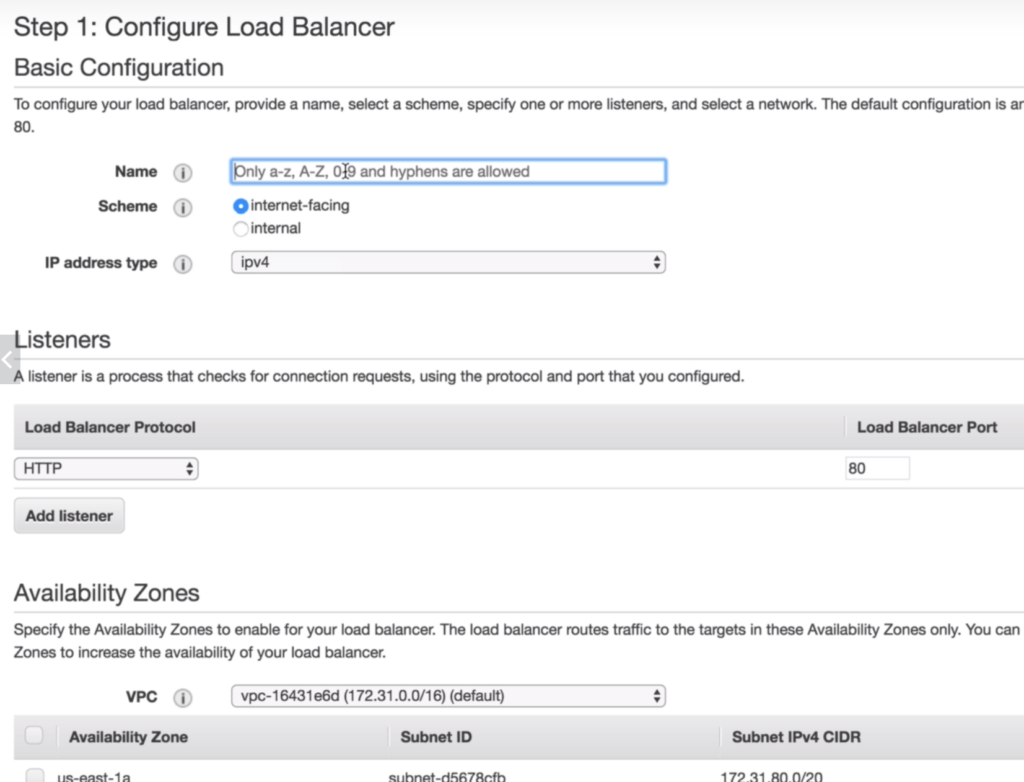
- Click on Configure Security Groups.
- Assign Security groups. (DMZ created earlier)
- Configure Routing > Name MyWS Group

- Review and Create
- Wait for ELB to come up.

- On Left menu in Target Groups select Targets and see if its healthy or not.
After this, go back to Route 53
Create A record and point to this Load Balancer.
Once done, open browser and website. It will point to our EC3 instance through ELB
CLI Demo
- In Terminal connect to EC2 Instance.
- ssh ec2-user@IPADDRESS -i MyKeyPair.pem
- sudo su
- aws s3 ls (credentials not configured)
- aws configure
- Enter AWS Access Key Id
- Enter AWS Secret Access Key
- Default Region
- Default output format
- aws s3 ls (No list)
- aws s3 mb s3://MyBucketName
- aws s3 ls (shows my bucket just created)
- echo “hello world” > hello.txt
- aws s3 cp hello.txt s3://MyBucketName
- aws s3 ls s3://MyBucketName (Will show the file)
Learn about CLI Commands: https://docs.aws.amazon.com/cli/latest/
Important S3 Commands
- cp > Copy Object
- ls > List
- mb > Make Bucket
- mv > Move Object
- presign > Generate a pre-signed URL for an Amazon S3 object.
- rb > Remove Bucket
- rm > Remove Object
- sync > Sync directories and S3 prefixes
- website > Set Website configuration for bucket
Exam Tips
- Use Least Privileges
- Create Groups
- Secret Access Key is available ONCE only.
- You can re-generate new
- Use aws configure to set the keys
- Create separate key for each user in a group and don’t share.
- Don’t save keys inside your files. e.g. on GitHub
Installing CLI client on PC
https://docs.aws.amazon.com/cli/latest/userguide/install-cliv2-windows.html
EC2 with S3 Roles
- In AWS Console go to IAM.
- Go to Roles and select Create Role
- Select Role for AWS Service

- Select Service EC2 for the role.
- Select Next: Permissions
- Select Role AmazonS3FullAccess Policy of least privileges.
- Give Role Name MyS3AdminAccess
- Create Role
- Now go to EC2 instance. Select Instance. From Actions select Attach/Replace IAM Role.
- Attach Role to EC2 Instance.
- Now if you try on CLI to access this S3, you will still get error.

- Go to hidden directory ~/.aws and delete two hidden files config and credentials that were set earlier by the KeyPair.
- After this you will be able to access S3 as per the role configurations.
- In Windows this file is at %UserProfiles%\.aws
Exam Tips
- Roles allow you NOT to use Access Key ID and Secret Access Keys.
- Roles are preferred from security perspective
- Roles are controlled by policies
- Policy changes effect immediately.
- You can attach/detach roles on running EC2 instances without having to stop or terminate the instances.

